Taking a grinder to Britain's motorcycling heritage.
Disclaimer
This "Blog" represents the thoughts and actions of the author. It is created for academic interest and entertainment only. It is neither intended or implied that any person reading any article contained within, imitates or recreates any work described.


BRITISH CLASS

BRITISH CLASS
TRIUMPH GP500
Showing posts with label Skankweasel. Show all posts

Sunday, 4 May 2014

Pedalling To A Standstill


For anywhere between 80 and 100 pounds you may be lucky enough to find a standard rigid Triumph brake pedal on the Bay Of Fools, chances are it won't be straight and it's almost guaranteed the foot pad will be worn down.
BIW tip of the week, buy a 350/500 Enfield Bullet pedal and pivot bolt for about twenty quid and massage it with the gas axe for a good close fit.


OK I know the return spring ain't the prettiest in the worls but it works oh so well and finding a regular coil type torsion spring to fit the rear brake plate has proved difficult up to now.

Wednesday, 23 April 2014

A Nice Pair............


A brace of new 626 Concentrics, jetted to what they call a "standard build" which is pretty close to the sizes given for the race kit carbs, and ya gotta start somewhere! Standard they said, still took nigh on 5 weeks to come! Too busy shipping 'em o'er The Pond I guess.

Friday, 20 December 2013

Are You Sitting Comfortably?


After a seat for Skankweasel, and have placed an order with Pedro of D H Customs  for one of his hand worked leather solos. He does some lovely work and at a great price for something hand made and unique, well worth considering if you're in the market this winter.

Sunday, 6 October 2013

It's In The Bag...................Thanks Lucas!


This oil tank form The Factory Metal Works has been on my watch list for months. Looking, nay lusting, at it almost on a daily basis, already plumbed for Triumph fittings and cooler than a walrus' cod piece, I knew I had to own one.


Well there's no time like the present, (or no present like the time if you're a clock maker at Christmas) and the order went in.


All the stuff from Lucas, that I've seen, reeks of quality workmanship. Don't let the price put you off with his parts, that will be long forgotten when you're still admiring the piece in years to come.


I went for the unpolished, centre fill option, there's no shame in showing these welds off to the world, although a hinged seat now becomes a necessity, I can live with it.

Sunday, 18 August 2013

Triumph - Rocker Revival


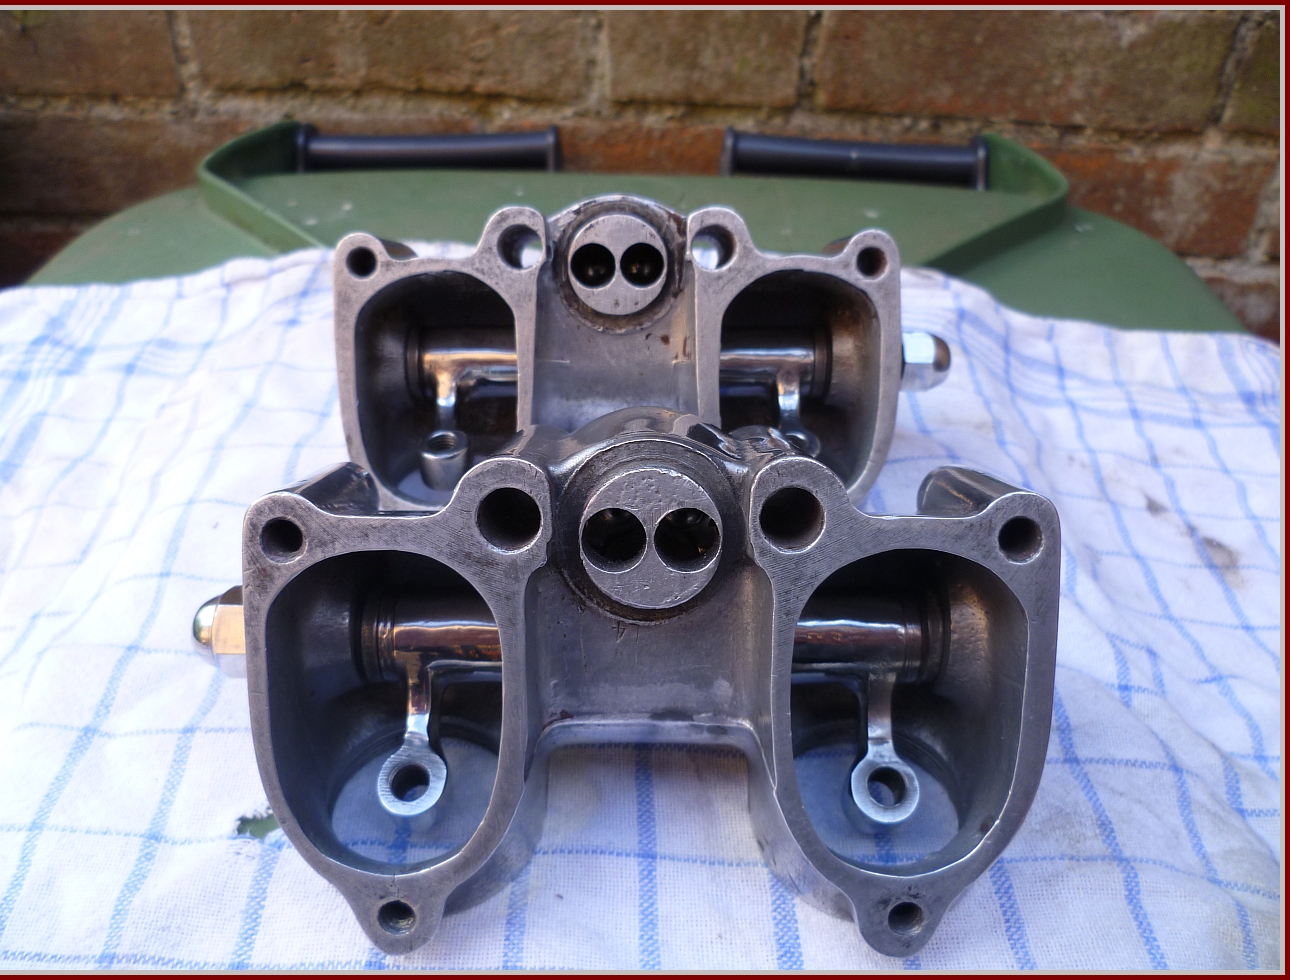
Rocker boxes almost ready to go on, decided on a light buff job rather than the full show polish, looks more purposeful. The bolt and stud bosses have been spot faced for a flatter fit. New Old Stock rocker spindles of the later type, with "O" rings are now fitted.


Rockers lightened and polished to balance the weights between the components, it is recommended in some quarters to reduce the diameter of the arm ends much more than this but discretion won the day in this case. The Thackeray washers are out and have been replaced by 1/8" thick wood saw arbor spacers, kindly sent over by Bill "Boomer" Brown of Portland Oregon.


Rocker caps drilled and fitted with vented breather plugs, these came from a hydraulic fittings company and are used to vent small hydraulic tanks. The ones behind are sintered pneumatic exhaust breathers, second choice and plan B if the others don't flow enough air.


Some people say that this modification is a waste of time due to sucking as much air in as they allow out. Any pressure created by the bottom end by the pumping action will be above atmospheric pressure, any air that is drawn in cannot be above 14.7 p.s.i. (atmospheric pressure) so it's got to be good, I think! Anyway oil leaks are created by pressurised oil looking for a way out, this mod should help alleviate that problem.

Sunday, 2 June 2013

Off Yer Rocker


...and so it begins.
This is one of the rocker boxes that will be used for the motor in Skankweasel, no point in showing the pair of them as they are pretty similar. The rockers will be lightened around the adjuster boss and ball pin areas only, the rest will be blended where needed and polished in accordance with Dwain Taylor's suggestions. The rocker spindle shown here, is the early type without the "O" ring on the drive side end, it also shows slight mushrooming on that end, so it will be replaced.


Realised, when it was too late, that it would have been easier to slacken the adjuster nuts off while they were still in the boxes. Rather than risk damage by clamping the rockers in the vice, I slipped a 2 metre length of 12 mm tube through the pivot bore, this provided enough leverage to allow the nuts to be loosened without damage or drama.

Wednesday, 29 May 2013

Length Is Important !!!!


Seein' as Eric is working his magic on the head, thought it's best to be reading up on a bit of tuning. Also got some really helpful insights  from the blokes on The BritBike Forum. there is a rake of real, been there and done it experience on there.
So, anyway, I was looking at inlet tract calculations, and to get the benefit of the tuned length between 3,500 and 5,000 revs, the inlet needs to be 12 1/4" from the center of the inlet valve to the lip of the velocity stack. 
As ya can see, it will make for an interesting oil tank!

Saturday, 25 May 2013

Rubber Suspenders


Had an idea to make up some rubber mounts for a while, and this is as good a time as any.
The holes in the rear mudguard were drilled 8.2 mm as it was known they were going to be pilotting the 1/2" Q Max hole punch. Punching the hole gives a lot cleaner edge to the hole, not like the hexagon a regular drill can give through thin shit.

The grommets are straight forward 1/2" (12.5 mm) wiring grommets, the top hats have been turned to match the bore diameter and thickness less 0.5 mm, just to snug up the fit.


Punching through......


..................... knocked out..................


................bushed in.


The guard weighs less than the bracketry, so it's difficult to see it not being alright.


I like this shot.

Sunday, 19 May 2013

Rear Guard Taking Up A Position


Skankweasel went out for a little trip to Martin's shop yesterday to get a little bit of TIG action going on the rear mudguard mounts. Had these bits water jet cut, nice finish, cleaner than Laser but worth the extra? I'm not so sure.


The brackets were cut with a 10 degree angle to allow for the curve of the guard. The tabs were welded on to the bracket after being bolted to the guard, to get the angle.


The bottom mount bolts to two 3/4" long bosses welded to the frame cross member. Not a thing I'm normally down with, but this rear section has had so much abuse over the years that it's not really heresy to weld extras to it.


The top mount is the same bracketry but picks up on the standard rear guard tapped holes.
There's still the rear loop/stay to sort out, and as it's aluminium a bit of rubber mounting will help.

Thursday, 16 May 2013

Tiger 100 Race Kit Manifolds Part Deux


Decided on the Hal Hall Route, good price and flat and all ya need, barring the thin wall steel tubes that were slotted down the bores of the manifold to seal the potential gaps. On the original factory Tufnol spacers, the nut recesses break through.


Definitely looks the part.
Some say that's Triumph's prettiest ever motor right there, easy to see why.


Meanwhile Bill slipped a pic in the mail.


Notice the tubes.....................................

Monday, 13 May 2013

Rear Wheel.........................Sorted!

Notice the cut axle plate, more scars from a previous life.

About 10 days ago I posted the previous back wheel, showing the cracks down the centre of the Morad rim. I phoned the guy who supplied it and he said send it back, well I didn't send it, I took it back the other day. He was genuinely shocked when he saw it, his second in command took me aside and said "He will go ballistic after you leave" doesn't want his name attached to bad quality, even if it's not his fault.


It was a good job I went, rather than have a new rim fitted to the KTM hub and still have the inherent problems with the brake anchor, I came away with this hub and D.I.D. rim. Much better, this has got a flat brake plate and adaptable anchor setup, the great slab of boiler plate you can see hanging down was already on there, but it's eminently workable now.


This hub is aluminium rather than magnesium as the KTM one was, but it's smaller, neater and all around better looking.

Saturday, 11 May 2013

Skankweasel Loses His Head!


The head is being sent down to Eric at the Historic Engine Company for him to work his magic.
The inlet rocker box mating face has obviously been skimmed at some time, clipping the guides in the process.


Combustion chambers are in great shape, although one inlet seat is sitting deeper than the others.


This picture was meant to show the standard inlet ports but it hasn't quite worked out. In standard form the ports are very smooth and of even cross section down their length. Don't know if Eric will feel it can be improved upon, we'll have to wait for that answer.

Friday, 10 May 2013

Thinkin' Outside The (Gear) Box


Thinkin' that ol' Skankweasel will hopefully be putting out more grunt than yer average 
Speed Twin, thoughts have been centred around beefing up the standard rigid gearbox mounting and adjustment setup. Started looking through pics of fifties drag bikes, to see what they did to keep things on the straight and narrow in that department. Couldn't see much, the old reproduced photos don't really lend 'emselves to close scrutiny. 
This trick Trophy was in among the same file.


I know it's a Beezer box, but that's gotta be the way forward ain't it?


Wednesday, 8 May 2013

Tiger 100 Race Kit Manifolds


The Delta Head is earmarked for the '53, and therefore not available for this build, but I still fancy putting twin carbs on the 51. Just wondering if anybody out there has got one of the original manifold kits as shown here in the bottom right corner. Not that I expect to buy one, but if you have one for sale I'd love to know about it, I'd just like to get hold of some decent pictures and measurements to see if it's possible to make one.

Usual addy if you can help.

Sunday, 5 May 2013

1955 T100 Bottom End


This is much more like it, 1955 Tiger 100 big bearing!
Picked it up yesterday in a shifty looking Motorway service station car park deal.


The guy had it on the Bay with an iron 5T top end attached, it didn't raise a bid. In the description he said he would break it (part it out) if it didn't sell. I slid in with what I reckoned was a reasonable offer, and as luck may have it so did he.


It's meant to be rebuilt and it certainly looks that way, but when they're down to this stage it's a quick and easy job to check.

The Skankweasel now has a heart!

Wednesday, 24 April 2013

At Bloody Last................ 56 T100 Cases


Finally got some cases, easy you'd think, set of everyday pre-unit Tiger 100 cases, not the case at all. Martin dropped these off yesterday. 1956 Big Bearing, everything a fellah needs.


Ya can just see the bearing bulge hangin' it's bottom lip out in this pic, makes all the difference an eighth of an inch sometimes.


They all do that sir................................
A milling cutter will clean up what's left of that, shame but it really is a case of"Beggars can't be choosers" here. A few spots of weld on the inside where a couple of screws have broken through, and one or two heli-coils may well come in handy, but certainly a hell of good foundation to build from. Time to get the scrubbing brushes out first though.

Tuesday, 9 April 2013

Triumph Tiger 100 Or Not?


More like a Tiger 5T 

Scored this a few months ago, Tiger 100 on a set of alternator 5T cases, the numbers have been massaged so the crank cases are no good even if they are good. 


On the upside it's a big bearing motor, hence the ask for a set of mid/late fifties Tiger 100 cases a few posts ago. Externally the head and barrels look workable, but it may be on +0.060 and -0.040 won't know that 'til we have her to bits, but that's not until a new set o' cases are to hand


Looks like it's seen a bit of action in it's life.
Odd to see the distributor set up on there.

Big Bearing Tiger 100 cases still required folks.

Monday, 8 April 2013

Making A Mockery Of It (Part II)


Couldn't help but put the empty cases and gearbox in. Looking damn fine even if I do say so myself, and Micky looks happy in the back there. The frame was initially sprayed with a zinc galvanising treatment, the candy red was an afterthought and a bit of an experiment, it's growing on me, and will probably be along these lines at the finish.

Sunday, 7 April 2013

Making A Mockery Of It (Pt I)


I scored the front legs from Steve at The Strathbran Speed Shop a couple of weeks ago. Although the sliders are correct for a '71 - '73 Conical Hub twin, the stanchions had been changed at some time to suit disc brake type yokes, the earlier type still retain a taper for the top yoke whereas the later ones are parallel. These were swapped out yesterday afternoon, so just had to be offered up to see what effect the non-raked yokes would have. They look OK to me, the front wheel is a 19" and is not the one that will be used but the size is right and there doesn't seem to be a clearance issue. There was some concern that without the in built 10 degrees of rake given by the standard rigid yokes the front end may sit too close to the frame down tube, that's not the case and the steering will be quicker as a result of this change. 


The wheel dropouts had been butchered at some point in time, using a hacksaw and file, not a pretty site. A local retired engineer managed to set the frame up on his mill and opened the slots up to 7/8" to bring them back to square and even, he also turned up two "top hat" collars to accommodate the 17mm rear spindle. The spindle itself is a modified XL500 Honda item, figuring the make up of the steel would be right to make a spindle out of. A bit of a Homer Simpson moment "They say it was made from a larger spindle"
At the moment I am thinking of making a plate up to pick up the two holes on the silencer/rear footrest lug with a slot to take the brake anchor bolt, above the bottom rail. That will set the brake arm in about the right position and not look overly shite.


Staying with the standard headlight mounting method, the holes are there already and it's rubber mounted. Only used by Triumph for about three years at the start of the seventies it's gotta be the most stripped down look for a side mount you're going to get, and it makes a change from the ubiquitous Batesalike bottom mount set up.